El tamaño de la lámpara de araña de una villa de lujo debe comenzar con el comportamiento de la habitación, no con una fórmula de diámetro único. El hueco de entrada de la villa, el comedor, la sala de estar, la escalera, la suite principal y el salón privado le piden a la lámpara de araña que haga un trabajo diferente. Algunas luminarias crean dramatismo en la llegada; otros protegen la intimidad, el arte, las líneas de visión o la conversación en la mesa.
El riesgo de especificación es que las lámparas de araña de las villas parezcan decisiones de gusto personal hasta que el proyecto llegue a la instalación. Luego, la escala, la suspensión, el color, la atenuación, la limpieza, las piezas de repuesto y la consistencia del material se convierten en decisiones de construcción.
Kinglong Lighting puede ayudar a los compradores de villas de lujo al convertir las opciones estéticas en un archivo completo de especificaciones habitación por habitación antes de la producción.
Conclusiones clave
- Lógica de tamaño: Comience con la función de la habitación, la altura del techo, el ángulo de visión, la distribución de los muebles y el acceso de mantenimiento.
- Lógica material: El cristal, el metal, el vidrio, el cuero y la resina deben elegirse según el comportamiento de la luz y la distancia de contacto.
- Lógica de especificación: Los planos, los patrones de acabado, el CCT, la atenuación, la suspensión, la limpieza y los repuestos pertenecen en un solo archivo.
- Riesgo de villa: Una lámpara de araña puede ser hermosa y aun así fallar si bloquea las vistas, deslumbra o no puede recibir mantenimiento.
- Relevancia de Kinglong: La iluminación personalizada para villas necesita visualización, control de fabricación y documentación lista para la instalación.
El tamaño comienza con el comportamiento de la habitación
La lámpara de araña de una villa de lujo tiene el tamaño correcto cuando controla la proporción, la vista, la comodidad y el mantenimiento al mismo tiempo.
Kinglong iluminación de la villa La página conecta la iluminación decorativa con aplicaciones residenciales de lujo, y la Plataforma de diseño Mofun puede apoyar la visualización temprana. Las referencias a la iluminación exterior refuerzan la necesidad de ir más allá de la apariencia. La biblioteca de Iluminación IES ofrece un contexto de iluminación profesional, mientras BIEN Luz mantiene el confort visual a la vista.
El método práctico de dimensionamiento consiste en definir la función de la habitación antes de elegir el diámetro. Una entrada de doble altura puede necesitar una luminaria vertical que pueda verse desde varios niveles. Una lámpara de araña de comedor debe estar relacionada con la mesa, no sólo con la habitación. Un centro de mesa de salón debe evitar reflejos en mamparas y piedras pulidas. Una lámpara de escalera debe crear movimiento sin bloquear las líneas de visión seguras. Un mismo diámetro puede ser perfecto en una habitación y erróneo en otra.
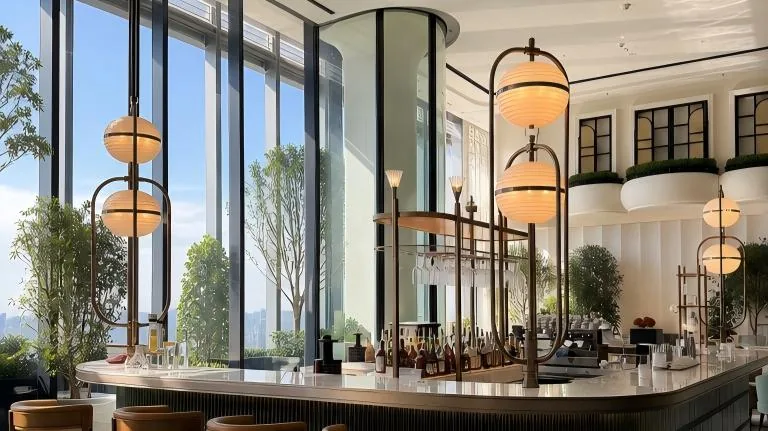
Los huecos de entrada y escaleras necesitan control vertical
Los pasillos de entrada y las escaleras a menudo tientan a los compradores a optar por la lámpara de araña más alta posible. La altura puede crear dramatismo, pero también genera riesgos de limpieza, suspensión y alineación visual. La luminaria debe revisarse desde la puerta principal, el rellano superior, el giro de la escalera y el umbral principal de la vivienda. Si la lámpara de araña sólo es hermosa desde una vista, la villa se sentirá menos resuelta a medida que la gente se mueva por ella.
El mecanismo oculto está cambiando el nivel de los ojos. El vestíbulo de un hotel generalmente se juzga desde la altura de circulación pública, pero el vacío de una villa se juzga desde las rutas diarias privadas. Los miembros de la familia ven la luminaria desde arriba, abajo, al lado y al otro lado. Por lo tanto, la especificación debe incluir planos de elevación, notas de la línea de visión, acceso de limpieza, detalles de suspensión y un plan de mantenimiento.
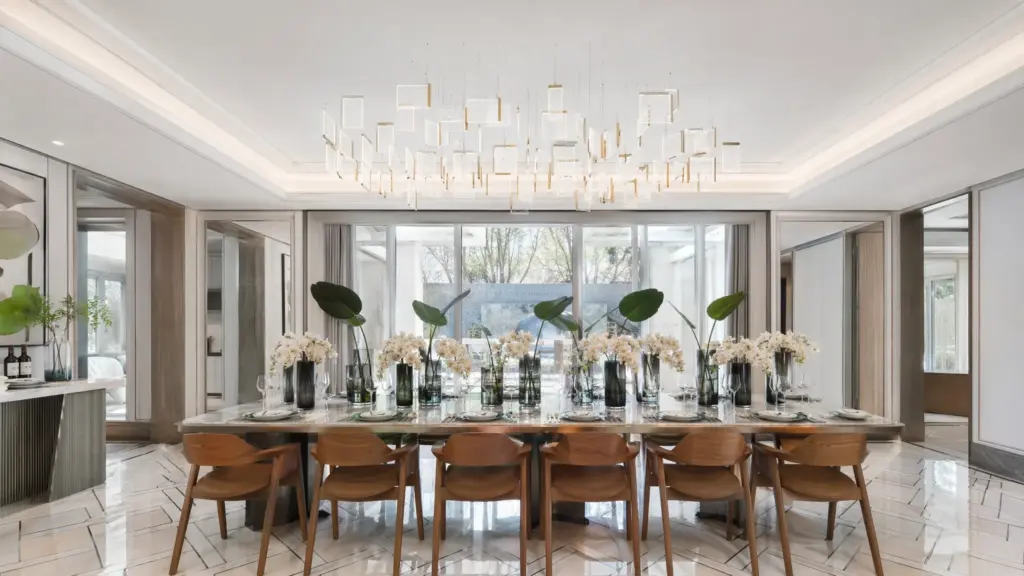
Las lámparas de araña de comedor necesitan intimidad, no sólo simetría
Las lámparas de araña de comedor deben estar relacionados con el tamaño de la mesa, la comodidad de los asientos, el color de los alimentos y la conversación. Una luminaria demasiado ancho puede abarrotar visualmente la mesa; una luminaria demasiado pequeño puede hacer que la habitación parezca irresuelta. La altura de suspensión correcta depende de la altura del techo, la escala de la mesa y el uso que la familia hace de la habitación. Un comedor formal y un espacio informal para el desayuno no deberían compartir la misma regla.
La calidad del color es importante porque cenar es hospitalidad cercana. Las preguntas frecuentes sobre DOE TM-30 es útil para discutir la reproducción del color con más precisión que una afirmación genérica de blanco cálido. En una villa, el color afecta la madera, la piedra, la vajilla, las flores, la comida y el tono de la piel. El proveedor debe documentar el CCT, la evidencia de color, el comportamiento de atenuación y la intención de la escena.
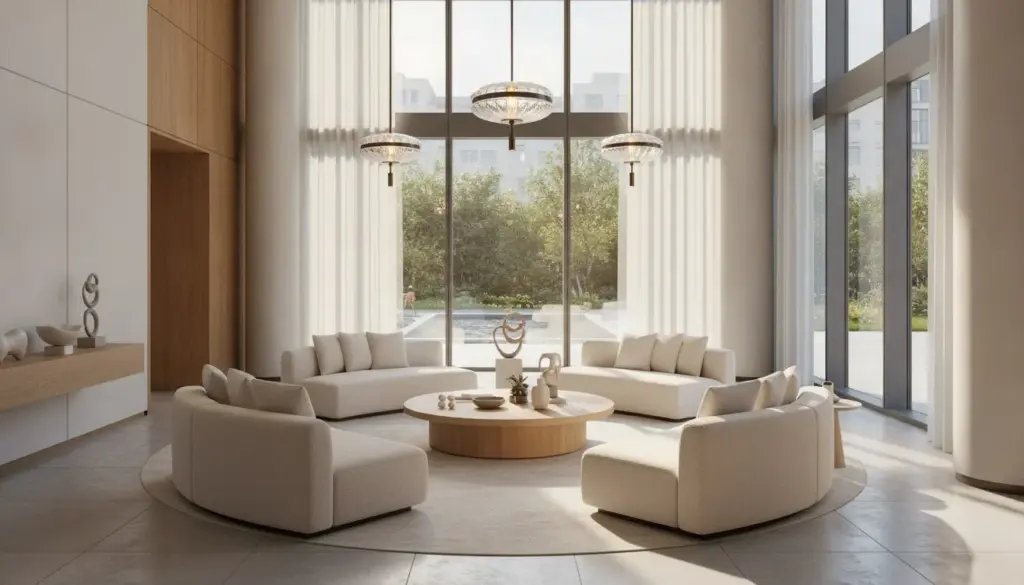
Los salones y suites necesitan disciplina contra el deslumbramiento
Las salas de estar y las suites principales suelen necesitar una jerarquía más suave que la de un hueco de entrada. La lámpara de araña puede seguir siendo un punto focal, pero no debe dominar todas las vistas. Verifique el dispositivo con la ubicación del televisor, las obras de arte, la chimenea, la altura de los asientos, los reflejos del espejo y las capas decorativas cercanas. Un grupo de cristales que luce impresionante en una representación puede crear destellos en el lugar equivocado durante la noche.
La mejor especificación de villa trata el deslumbramiento como una cuestión de lujo. Si un elemento fijo hace que los residentes entrecierren los ojos, se refleja duramente en la piedra pulida o distrae la atención del arte, no importa cuán premium sea el material. El diseño debe incluir una estrategia de difusor, protección de la lámpara, escenas de atenuación y la relación entre la lámpara de araña y la iluminación ambiental.
La elección del material debe seguir el comportamiento de la distancia y la luz.
| Material | Mejor uso de villa | Riesgo a comprobar | Evidencia de especificación |
|---|---|---|---|
| cristal k9 | Entrada, escalera, comedor formal | Deslumbramiento, limpieza, variación de claridad. | Muestra de cristal, ruta de limpieza, escena de iluminación. |
| Acabado metálico | Espacios de vida y galería modernos | El color no coincide con el hardware | Terminar la foto maestra y por lotes. |
| Vidrio artístico | Destacar salones y escaleras | Cambio de color bajo diferentes fuentes. | Maqueta bajo objetivo CCT |
| Detalles de cuero o latón | Cálidas zonas residenciales cercanas | Envejecimiento táctil a distancia | Tablero de materiales y nota de mantenimiento. |
| Resina o medios mixtos | Habitaciones privadas esculturales | Calor, coloración amarillenta, método de limpieza. | Datos del material y límites de uso |
La conclusión es que el material de lujo no es sólo una elección visual. Es una decisión sobre distancia, mantenimiento, color y envejecimiento que debe escribirse en la especificación.
El archivo de especificaciones de la lámpara de araña para villa 2026
Un archivo completo de lámpara de araña para villa debe incluir la función de la habitación, el plano de planta, la altura del techo, la disposición de los muebles, las líneas de visión, el diámetro o envoltura objetivo, la altura de suspensión, los detalles de la suspensión, la programación de materiales, los patrones de acabado, el color objetivo, el sistema de atenuación, la ubicación del driver, el método de limpieza, las piezas de repuesto, el plan de embalaje y los supuestos de instalación. El expediente también debe indicar qué decisiones son fijas y cuáles pueden cambiar después de la maqueta.
Las pruebas de seguridad y del producto también deben mencionarse con antelación, especialmente cuando el proyecto de una villa cruza fronteras o utiliza conjuntos eléctricos personalizados. Pruebas y certificación de luminarias UL es una referencia pública útil de por qué la evidencia de las luminarias debe incluirse en el archivo de especificaciones en lugar de en un correo electrónico tardío una vez que la lámpara ya está construida.
Calculado a partir de un archivo de especificaciones de villa de 8 partes: 3 partes faltantes / 8 partes requeridas = 37,5 por ciento del archivo sin resolver antes de la producción. Si bien faltan elementos como la suspensión, la regulación y el acceso para la limpieza, el proyecto no sólo se ha saltado detalles. Se ha saltado las decisiones que determinan si la lámpara de araña se puede instalar, disfrutar y mantener sin interrupciones.
Con base en este cálculo de especificaciones, los compradores de villas deben aprobar el diseño solo después de que la luminaria pase 4 controles: se ajusta a la envolvente de la habitación, protege la comodidad, puede recibir mantenimiento y tiene un archivo de prueba de materiales. Un hermoso renderizado no es suficiente para una lámpara de araña personalizada que puede permanecer encima de una escalera, una mesa de comedor o una sala de estar de doble altura durante años.

Cómo Kinglong Lighting puede dar forma al paquete de iluminación de una villa
Kinglong Lighting puede respaldar un paquete de villa combinando visualización, fabricación personalizada y control de especificaciones. La solución de iluminación para villas es el punto de partida natural para la planificación habitación por habitación, mientras que el flujo de trabajo de personalización puede convertir formularios seleccionados en dibujos, muestras, decisiones sobre materiales y transferencia de producción. Para la alineación temprana del diseño, el Plataforma de diseño Mofun puede ayudar a las partes interesadas a ver la escala antes de que se endurezcan las decisiones de fabricación.
La solicitud útil del comprador es un cronograma de la villa, no una cotización única. Pregunte por la función de la lámpara de araña de cada habitación, la envolvente objetivo, la prueba del material, el CCT, el comportamiento de atenuación, el acceso al servicio y los supuestos de instalación. Luego, un proveedor puede identificar qué habitaciones necesitan un diseño personalizado, cuáles pueden utilizar una luminaria de serie refinado y dónde la casa necesita una familia coordinada de materiales.
Entrega de especificaciones de la villa antes de las preguntas frecuentes
Antes de solicitar el precio de producción, prepare una hoja por ubicación de la lámpara. Incluya el propósito de la habitación, la altura del techo, la envolvente de las luminarias, el plano de los muebles, los ángulos de visión principales, el material de destino, las referencias de acabado, la preferencia de CCT, los requisitos de atenuación, el acceso para limpieza y cualquier restricción estructural. Agregue fotografías o renderizados que muestren materiales adyacentes para que el proveedor pueda juzgar el color y la proporción.
Si la villa utiliza varias luminarias personalizados, envíe a Kinglong Lighting el cronograma completo de la habitación a través del revisión de especificaciones de lámpara de araña para villa de lujo. Solicite un paquete coordinado que separe el diseño personalizado, la selección de series, la prueba de materiales, la visualización y los supuestos de instalación.
El cronograma también debe marcar las salas donde el trabajo personalizado no es el mejor uso del presupuesto. Un pasillo de servicio, un dormitorio de invitados o una sala de estar secundaria pueden necesitar una luminaria estándar refinado con acabado verificado y atenuación en lugar de una forma completamente personalizada. Nombrar esas habitaciones protege el presupuesto para las áreas de entrada, escalera, comedor o sala de estar, donde la escala y la prueba de materiales conllevan más riesgos de diseño.
Guías relacionadas
- Iluminación del St. Regis Resort: entorno tropical y tradición cristalina
- Glosario de iluminación de hoteles para especificadores
- Proceso de maqueta de lámpara de araña de hotel
Construya el paquete de especificaciones maestras de la lámpara de araña para villa de lujo antes de la aprobación final
El punto de partida útil para la guía de lámparas de araña para villas de lujo es el contexto de aplicación más que la preferencia decorativa. La cuestión práctica es si el propietario de la villa, el diseñador de interiores, el asesor de iluminación, el fabricante personalizado y el instalador pueden ponerse de acuerdo sobre lo que debe demostrarse antes de lanzar la lámpara. La respuesta es un paquete breve que convierte la intención del diseño, el riesgo operativo, la evidencia y la responsabilidad en una sola conversación de aprobación.
El principal riesgo es que los compradores de villas salten de la imagen de inspiración a la cotización sin pruebas de tamaño, material, iluminación, servicio e instalación. Ese riesgo es mayor cuando un objeto hermoso se separa de la evidencia que lo hace edificable, mantenible y seguro para su lanzamiento. Calculado a partir de una revisión de 6 etapas, 2 etapas sin resolver de 6 dejan abierto alrededor del 33 por ciento de la lógica de aprobación, lo cual es demasiada incertidumbre para un pedido de iluminación decorativa personalizada.
Trate cada habitación de la villa como un problema de iluminación diferente
La primera pregunta de aprobación debería definir la decisión de compra práctica detrás de la guía de lámparas de araña para villas de lujo. La decisión no es si una lámpara de araña parece premium de forma aislada; se trata de si el enfoque seleccionado protege el rol de la habitación, la experiencia del huésped o del propietario, la realidad operativa y el traspaso de la producción al mismo tiempo. La nota de la versión debe nombrar al propietario de la decisión, la prueba esperada y el cambio que obligaría a un rediseño. Ese límite permite al comprador rechazar una opción tentadora por una razón específica en lugar de confiar en el lenguaje del gusto.
Proteja la escala con tamaño basado en vistas
El primer punto de falla suele aparecer donde la promesa visual se encuentra con el uso diario. Calculado a partir del paquete de especificaciones maestras de la lámpara de araña para villa de lujo de 6 etapas, 1 etapa débil multiplicada por 4 equipos posteriores equivale a 4 rutas de revisión que pueden retrasarse por un elemento de prueba perdido. La revisión debe incluir la vista o condición operativa que sería más costosa de arreglar más adelante. El comportamiento y el contexto de la escena deben probarse antes de que el dispositivo se considere listo para su lanzamiento.
Elija materiales por comportamiento ligero y cuidado.
La evidencia del proveedor es útil sólo cuando coincide con el riesgo que se está controlando. La solicitud debe convertir ese riesgo en pruebas tales como envolvente de la habitación, verificaciones de vista, muestras de materiales, CCT y notas de atenuación, método de suspensión y plan de servicio. Si el riesgo es de escala, solicite una elevación marcada y una vista de línea de visión. Si el riesgo es el color, solicite una muestra del material debajo de la escena de destino. Si el riesgo es mantenimiento solicitar ruta de limpieza y lógica de repuestos. La evidencia debe cambiar la decisión de liberación, no adornar el expediente.
Hacer que el paquete de especificaciones viaje a producción
El flujo de trabajo del proyecto de Kinglong Lighting mueve lámparas de araña personalizadas para hoteles y villas a través de dibujos, muestras, fabricación, embalaje, envío e instalación en el sitio. El traspaso final debe indicar qué se aprueba, qué permanece flexible y quién puede rechazar un cambio. En la práctica, el paquete de autorización debe incluir al menos 6 etapas con nombre y un propietario para cada etapa. Eso evita que una sugerencia posterior se convierta en un rediseño después de que el dispositivo ya haya entrado en producción.
Preguntas frecuentes
¿Cómo puedo dimensionar una lámpara de araña para la entrada de una villa de doble altura?
Comience con el volumen de entrada, los ángulos de visión, las rutas de escaleras o rellanos y la limpieza del acceso antes de aplicar cualquier regla de diámetro. La lámpara de araña debe sentirse proporcional desde la puerta de entrada, el nivel superior y el umbral principal de la vivienda. Confirme los puntos de suspensión, la altura de suspensión, el deslumbramiento y el método de mantenimiento antes de aprobar el tamaño final.
¿Qué material de lámpara de araña funciona mejor para villas de lujo?
El mejor material depende de la distancia entre habitaciones, el comportamiento de la luz, el mantenimiento y los acabados circundantes. El cristal K9 puede adaptarse al brillo formal, el metal puede soportar la moderación moderna, el vidrio artístico puede crear una característica escultórica y los materiales mixtos más cálidos pueden adaptarse a zonas residenciales cercanas. Solicitar muestras físicas según el CCT previsto.
¿Deberían las lámparas de araña de las villas utilizar el mismo CCT en todas las habitaciones?
No, no todas las habitaciones necesitan el mismo CCT, pero el hogar debe sentirse coherente. Las áreas de comedor, salón, escaleras y dormitorios pueden utilizar diferentes escenas si los materiales se mantienen consistentes y las transiciones son suaves. La especificación debe documentar el CCT, el rango de atenuación y cómo se relaciona cada lámpara con las capas de iluminación cercanas.
¿Qué se debe incluir en las especificaciones de la lámpara de araña de una villa?
La especificación de una lámpara de araña para villa debe incluir la función de la habitación, las dimensiones, la altura del techo, la envolvente de la luminaria, el método de suspensión, los materiales y acabados, el color objetivo, el sistema de atenuación, la ubicación del driver, el acceso de limpieza, las piezas de repuesto, el embalaje y los supuestos de instalación. Cuanto más personalizado sea el dispositivo, más importante se vuelve el archivo de lanzamiento.